How to analyze metadata and hide it from hackers
In this post, we’re going to explore the dangers and risks of the tip of a very huge iceberg of sensitive information companies are exposing: the metadata of a document. “What is it and why is it such a juicy source of information for advanced attackers?” you might ask. Well, a document’s metadata allows to collect various high-sensitive data such as usernames, software used in a company, location of file shares, and so on.
Hackers often exploit document metadata to gather sensitive information about individuals or organizations. Metadata, which includes details like the author’s name, creation date, and file path, can reveal a lot about the document’s origin and content. By accessing this information, hackers can identify potential targets, understand internal processes, or even uncover security vulnerabilities.
For example, metadata might disclose the use of specific software versions, which could be prone to known exploits. Additionally, metadata can provide clues about the structure and hierarchy of an organization, aiding in social engineering attacks. To mitigate these risks, it’s crucial to sanitize documents before sharing them externally.
As part of a practical exercise, we can even show you how you can find what metadata your company is leaking. Collecting this metadata for analysis and creating a nice Splunk dashboard gives you a completely new type of Threat Intelligence and situational awareness about your company’s attack surface for a very low cost.
What is a document’s metadata?
If you already know what metadata is and what it contains, you may want to skip to the section “Mapping your attack surface”.
Every organization is producing files on a daily basis with content that is approved for publishing. There’s a catch to that: You as a company are in fact publishing more data than you think. Every time a document is created, software that was used to create that document inserts so called metadata which can be described as data about data.
What does it ‘data about data‘ mean? It’s not the content of the file but rather:
- What software has been used to create this file? (e.g. Microsoft Word 2007)
- What user created this file? (e.g. john.doe, u12345)
- What is the computer name where it was created? (e.g. Super Secret Lab PC N203)
- When the file was created?
- When the file was last modified?
- When the file was printed?
- File path on the disk/share from which the file was exported (e.g. \\DOC_SERVER\DOCS\PATENTS\Wormhole_travel_engine.docx)
- And much more…
Here’s an example of document metadata:
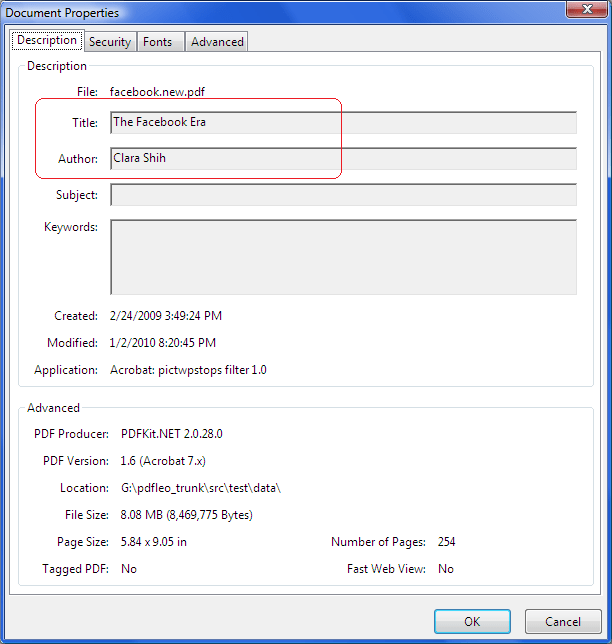
This information is automatically inserted into the document by the software you use to create/modify the document. The amount and type of information inserted depends on the used software and its configuration. It’s rarely seen that organizations try to limit the spread of this information. As a result, this sensitive information is exposed and adversaries may invest time in analyzing this exposed information about your business.
Metadata reconnaissance: A hacker’s gold mine
Generally, there are three types of attackers that your organization is most likely to face:
- Script kiddies
- Advanced attackers/APTs
- Insiders
Insiders are out of the scope of this article. The remaining two have several interesting differences. One of the biggest distinctions between a script kiddie and an advanced attacker is how much time they spent on the reconnaissance phase in the cyber kill chain.
The reconnaissance phase of a hack
Reconnaissance is one of the most important phases of a hack, often determining whether the attack will be successful or not. A threat actor is mapping the battleground, looking for targets and all the available surrounding information to increase the success of the planned attack. The threat actor is commonly looking for either an asset (an unpatched server connected to the Internet) or an individual (Jane Doe from the finance department running on Windows XP that was never updated) to be compromised.
Finding vulnerable assets is done by doing subdomain enumeration, discovering internet exposed devices in your company’s IP range and running a vulnerability scan on top of it. It’s a little bit more complicated when it comes to finding an individual to compromise. This requires doing online OSINT (Open Source Intelligence), using for instance LinkedIn. OSINT often reveals a list of employees or even full organizational charts. How does an attacker find who is the most vulnerable person from the target’s organization? That’s the tricky part.
Using metadata to help select a target
We’re all bombarded with industry reports about how phishing attacks made it to become the #1 vector to compromise a company. This can be done by sending an innocent looking email, attaching a Microsoft Word document with a nifty VBA macro which drops custom PowerShell RAT. With a good pretext and preparation, the target is very likely to open the attachment.
Would this attack be successful? Maybe. The attacker wants to increase the success of the attack, but not by sending hundreds of those emails which will raise a red flag for the security team monitoring your company. How to do that? Here’s a brief list of what can increase the chances for a compromise and in the post-exploitation phase:
- What software is the target using? If he/she uses LibreOffice rather than Microsoft Word, sending a VBA macro wouldn’t work in that case.
- What is the operating system of the target? Exploit leveraging a vulnerability in how Windows parses TTF fonts wouldn’t work on Mac OS.
- What’s the target’s username & e-mail address? This helps with getting a foothold in the post-exploitation phase while staying under the radar.
- What is the file share where most of the company documents are stored? An attacker can plan a lateral movement once the target is compromised or just blow it off with a targeted ransomware attack.
- Which contractors are working for the target’s company? It’s known that advanced attackers sometimes choose contractors because of less strict security measurements.
What should organizations do about visible metadata?
Now, would you publish all this sensitive information on the websites of your company for anyone to download and use in their interest? No? Well… Allow us to tell you that this is exactly what you are doing by publishing files on your websites without removing the metadata. All of this information can be found there and many organizations don’t even know it’s there (we call it dark data).
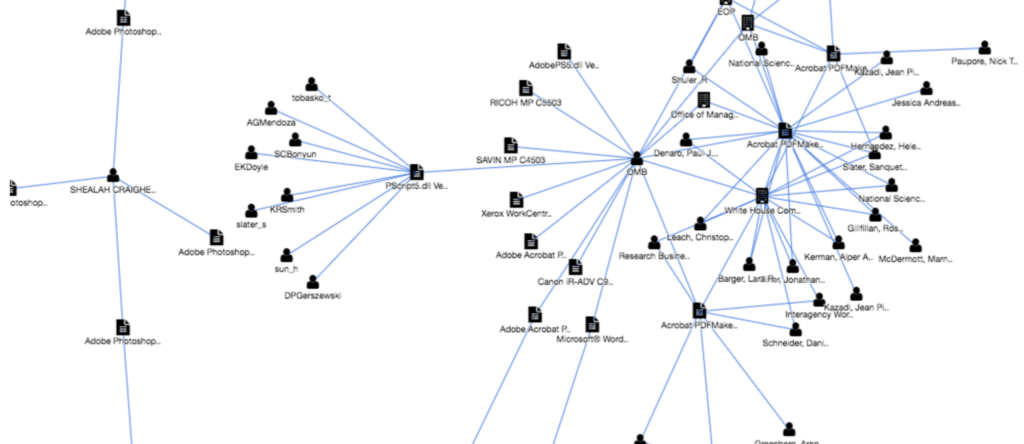
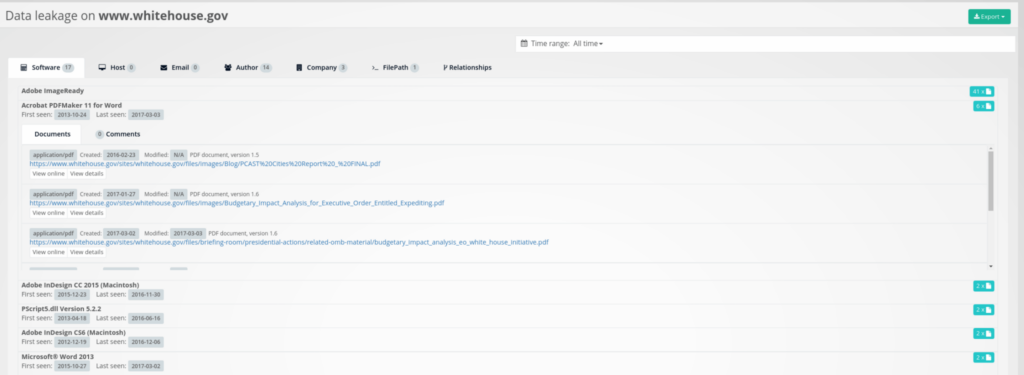
Dark data shouldn’t be published and poses a huge security risk to your company. Also, you may be aware some regulations such as the GDPR (General Data Protection Regulation) require you to build and maintain an inventory of your files/data. Have you included also all your publicly exposed files and this sensitive data that you are publishing? Below picture shows a contextualization of sensitive information found in the form of a relationships graph (this feature is available in the Outpost24 External Attack Surface Management Platform).
Collecting valuable information around metadata
This is the type of threat intelligence that your security team should be collecting. Buying TI from vendors about all the APT actors with their IOCs is cool, but it costs tons of money and most of it will never appear in your environment anyway. We recommend that you focus first on understanding how you are perceived by your adversaries, what the attack surface of your company is, so you know at least what you need to protect and keep a very close eye on.
Avoiding situations where your company’s attack surface is leaking a list of sensitive usernames screaming “I’m running on Windows XP ’cause service desk is too lazy to upgrade my laptop to something more secure.” Well, how do you do that? Read on, we will show you our secret methods!
Mapping your attack surface
As an example, we’re going to pretend that we are security analysts taking care of the whitehouse.gov and usa.gov seed domains, which will be used to map the attack surface of the leaking metadata and contextualize the findings. We encourage you to do the same for your company afterwards. You might be surprised how much you will find and how much of it you don’t want to be exposed to the outside world!
The first part is obtaining the documents published on the websites of our interest. There are various techniques for this:
- Crawl/mirror the website, downloading all the content.
- Use Google/Bing dorking to find public files.
- Ask the responsible team in your company to give you a dump of published files if possible.
The easiest and dirty way is to just mirror the website by downloading everything published there to local disk using wget:
wget -mk https://www.example.com/
The most obvious downside is that this approach is going to download also HTML and other content which we are not interested in. However, this content can be filtered later on using a bash script.
Using Google or Bing
A more targeted way is to use Google or Bing dorks to find documents indexed by those search engines. This is also what some other tools such as FOCA use to find documents (works in both Google & Bing):
site:example.com filetype:pdf
Pro tip: For these types of dorks (filetype), Bing tends to find more than Google.
filetype part of the dork can be further adjusted/changed to look also for office files, pictures, etc. This approach avoids downloading unnecessary content from the target website and covers subdomains (searching under site:example.com covers blog.example.com in most search engines) and thus increases the intel coverage. On the other hand, it relies on a search engine and what files it indexed which may exclude some interesting parts due to robots.txt file.
It’s also more a manual job to download those files or a little bit harder to script if you wish to do it automatically. If you are looking for a tool to collect the dorking results for you, rather than manually compiling a list of thousands of URL’s, then take a look at snitch. Snitch is a little bit of an older tool, but still serves its purpose (you can search GitHub for keyword dork to find similar tools). You can obtain the list of exposed documents by running snitch with following arguments:
python2 snitch.py -C "site:whitehouse.gov filetype:pdf" -P 100
A more comprehensive attack surface map
If you want a complete attack surface overview, it’s recommended to combine both approaches: crawl/mirror your websites and enrich it with documents via search engine dorking techniques afterwards.
Once we have the files, we will use a popular tool called exiftool to extract the metadata from it with a combination of CLI switch -j. The output will be in JSON format which we can pipe to Splunk where we can analyze all the data with the up-most beautiful (and scary) dashboard.
Download the bash script that the Outpost24 tech team prepared for you to process the metadata.
This script can be used in two ways:
- You can run it by giving a location to the folder where website content is downloaded. It will then run exiftool to extract the metadata into the
metadata.jsonfile in the current working directory and filter out uninteresting files (such as HTML & text files). - You can pass it a second argument which is a location of the file containing a list of URLs which will be downloaded and then analyzed for metadata (for example a list of documents you obtained through Google dorking).
Once you have your metadata.json file, we are going to import it into Splunk running in a Docker container. First, pull a Docker Splunk image from the official Docker repository:
docker pull splunk/splunk
And then start it:
docker run -d -e "SPLUNK_START_ARGS=--accept-license" -e "SPLUNK_USER=root" -p "8000:8000" splunk/splunk
Once you have Splunk running on port 8000 locally, access localhost:8000 with your web browser and go through initial setup (changing default admin password). When completed, import your metadata for analysis:
- Click
Add Dataon the main dashboard or from settings panel in menu. - Click
Upload. - Go next to setup source file. You can leave these settings as they are by default, Splunk should automatically detect that it’s a JSON file and parse it automatically.
- Go to the next page and in the
Indexsection create a new index nameddocument_metadata(just give it a name, leave other settings unchanged), we will be using this index in search queries described further in the article. If you are going to use a different index then don’t forget to adjust the queries accordingly. - Confirm the changes in the
Reviewsection and finish the import of data.
How to analyze your metadata
You now have everything ready from the data side so let’s jump to the more interesting part and analyze the data we just collected.
Software that embeds the metadata is commonly doing it by using a key-value scheme. The precise format depends on the file format. Luckily, exiftool extracts it for us into a JSON dictionary that is automatically parsed when imported into the Splunk instance. Key here is the metadata name and it’s value that we are interested in such as who created the document, what software was used, etc. We need to know these metadata field names to filter out the data we want.
Unfortunately, those field names are not standardized, different software can use different field names with the same meaning. For example, there is a field called “Creator” which contains the information about the software used to produce the file. Some software use field “Producer” to store the same information and there’s also a software using both fields where “Creator” is the main software and “Producer” is a plugin used to export the document.
Splunk analysis
Since we now started talking about the software used to produce these files, why don’t you actually now take a look at it and see for yourself what has been found in the metadata?
Copy-paste the following query into your Splunk search:
index="document_metadata"
| eval software=mvappend(Creator, Producer)
| mvexpand software
| where NOT match(software, "^\W+$")
| stats dc(FileName) as count by software
| sort -count
Which will produce a table like this:
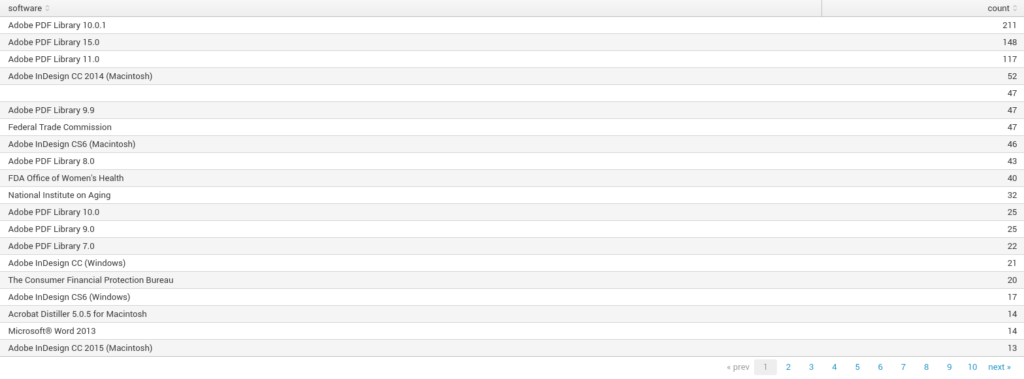
See that Word 2013 at the bottom? You think it should be there? No? Then send an e-mail to your service desk to fix it. We can also see that some values aren’t actually software names/version but rather company names. It is a good practice of configuring the software used in the company to put the company name instead of the software details itself. Software in your company should be configured to do the same.
The query above can be extended using regex to hunt for specific old versions of the software. This field can also be used to search for what kind of printers the company is using (Hint: search for keyword xerox). One day a mysterious technician from Xerox can appear at the front reception delivering a replacement part for that Xerox WorkCentre 7970 you have on the second floor at the financial department Mark Sandy is using… or use it as an “Advanced Persistent Printer”
Analyzing user/author metadata
Let’s now explore various users who created published documents with this query:
index="document_metadata" Author="*"
| stats count(FileName) as count by Author
| sort -count
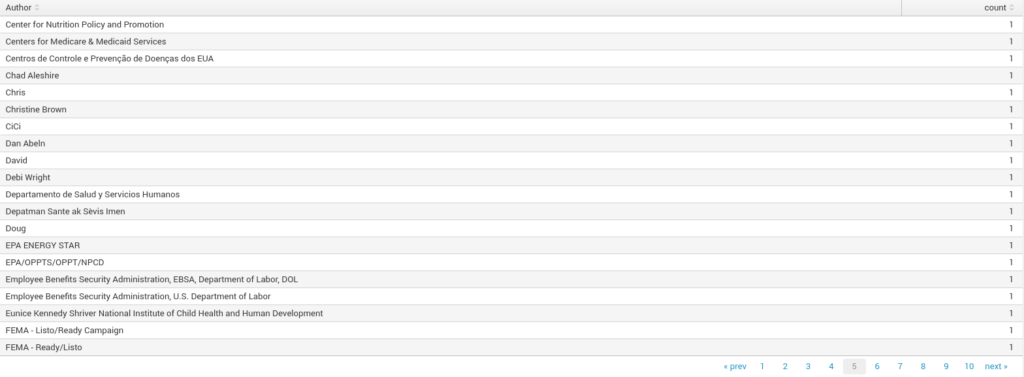
The Author field commonly contains the name of the person as it’s set in the OS or software license that produced the file. In the case of corporations, it very often contains the username. The attacker can hunt for those usernames which are often something like u12345, john.doe or a similar format. These can be filtered by using a regex in Splunk query such as ^[a-z]{1,3}\d{3,}$, the other username formats can be found similarly also with regex.
Additional usernames can be extracted by tweaking the file path regex showcased later on or using the field LastModifiedBy which include the same type of information as the Author field.
As we briefly touched the topic of personal information found in metadata, what about e-mail addresses? Regex, once again, comes to our rescue. To be more specific, this Splunk query:
index="document_metadata"
| rex field=_raw "(?<email>[-\w._]+@[-\w._]+)"
| search email!=""
| table FileName, email

Searching for keywords in metadata
When creating documents, the creator sometimes puts keywords to it. This is used to help to search for a specific document inside the enterprise file share (where’s that super secret excel sheet with the SOC budget for next year?). As you may have guessed, it’s a part of the metadata that is a little bit more complicated to retrieve.
The difficulty is that some software embeds an array of values, another software embeds it into the metadata as a long string with , (comma with space) as delimiter and so on. So loads of variations here. Luckily for us, it’s not a big deal for Splunk and this query can do it for us:
index="document_metadata" Keywords!=""
| eval keyword=case(
  isstr(Keywords) and like(Keywords, "%, %"), split(Keywords, ", "),
  isstr(Keywords), split(Keywords, " "),
  1=1, Keywords
)
| mvexpand keyword
| regex keyword!="^\W+$"
| stats count as kw_count by keyword
| sort 20 -kw_count
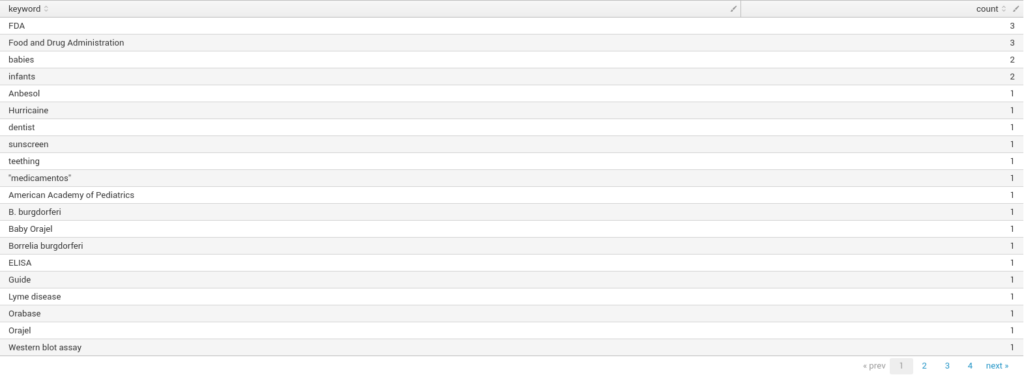
In general, keywords aren’t the most interesting metadata out there, but in some cases, it can be used to find something very interesting, that’s when you go looking/filtering on keywords such as confidential, restricted and so on. We have seen it several times that documents marked as confidential have been published by accident on a company website. Hunt for them and take them down.
Of course, it also depends on how your organization is marking document levels. Some software can put it into a separate metadata field rather than keywords, or it might not be in metadata at all. You can also index a whole document’s content by Splunk to search inside it for these confidential keywords. This part would need to be adjusted per company as it often varies.
Searching files for author comments
Similarly to keywords, documents also contain comments left by the author when writing, for example, a draft before publishing the final revision or personal opinions/notes. It’s not unusual that the author forgets to delete those comments before publishing the document. It can be painful to a company’s reputation to leak confidential information especially in the case of lawyers… Let’s check your footprint for comments:
index="document_metadata" Comments!=""
| table FileName, Comments

Diving into the more scary part: file paths. These paths often contain either a path on a local disk of the person producing the document or a file share location on a network, although there can be also other interesting locations exposed just as the file structure on a web server. How is it possible that such artifacts are even contained in metadata? The most common case is exporting a document or conversion between formats.
Let’s say that you prepared a Word document for publication on the website when the final version is approved, you export it to PDF and then publish online. Most of the software that takes care of exporting the document in an other format (or better say a plugin within the software for converting it into other formats) embeds the information about a file which was used for conversion into the target format as it can be often seen that an MS Word docx file was used to produce the PDF report.
Other less common cases which results in this artifact is importing the file and another one is when a file is printed although this one is rarely seen but if so, it then often contains also some kind of printer identification (name & model, IP address on network etc…). Extracting file paths from metadata is a little bit more complicated as we are going to use regex to find either /unix/style/paths or \\windows\file\share\paths:
index="document_metadata"
| rex field=_raw "\"(?<file_path>(([A-Z]:)?\\\\\\\\|/)([-a-zA-Z _\.]+(/|\\\\)){2,}[^\"]+)\""
| where file_path!="*"
| table FileName, file_path

Analyzing metadata timestamps
Until now, we’ve been mostly playing with metadata having values as a string, however, there are also various metadata that contains timestamps allowing us to parse it in Splunk into a format that is understood as a date and time and plotting it into the charts. One of those timestamps that are very often inside the document metadata is the time of creation of the document which can be extracted with this query:
index="document_metadata" CreateDate="*"
| eval document_created=case(
  match(CreateDate, "^\d{4}:\d{2}:\d{2} \d{2}:\d{2}:\d{2}[-\+]\d{2}:\d{2}"), strptime(CreateDate, "%Y:%m:%d %H:%M:%S%:z")
)
| eval _time=document_created
| bucket _time span=1d
| timechart span=1d dc(FileName) as documents

And similarly it can be also be done to extract when the document was modified the last time:
index="document_metadata" ModifyDate="*"
| eval document_modified=case(
  match(ModifyDate, "^\d{4}:\d{2}:\d{2} \d{2}:\d{2}:\d{2}[-\+]\d{2}:\d{2}"), strptime(ModifyDate, "%Y:%m:%d %H:%M:%S%:z")
)
| eval _time=document_modified
| bucket _time span=1d
| timechart span=1d dc(FileName) as documents

When parsing the time in Splunk, we need to take care that different software can put timestamps in different formats into the metadata. Increasing the coverage of parsing those additional formats can be easily done by extending the case clause in the query. From the picture, we can see that we are able to track files from many years ago! At first this timeline might not seem to provide a lot of information however it can be used in several ways.
By analyzing the spikes in a monthly drill down, one can see the company activity that they produce and update public content the second week around Tuesday every month. This is not such a big deal although it provides some intel when the adversary is planning the attack.
What’s most interesting for the attacker is to filter out what documents have been recently created. Using the queries above we can find out that someone was using MS Word 2007 which we all know is very outdated these days and provide a very good target to be compromised, however, combining it with timestamps, we can learn that the last time we saw it being used in a company was December 2007. With this additional insight, our perfect target is suddenly not that perfect anymore.
On the other hand, if we see that it was created using MS Word 2007 just a week ago, guess what the odds are that the poor soon-to-be-compromised-guy-if-not-already is still using it today…? Those are the employees you want to hunt for from the security perspective, they’ve been slipping under your radar for many years, or the service desk was not doing a good job or perhaps in the case we’ve just seen is that they have friends at the service desk to arrange not to update their office suite because they hate the new Office 365 interface that is standard at your company… Either way: you need to fix that.
Wrap it all together in a user-friendly dashboard
In the section above, we covered some of the basic queries that can be used for threat hunting in the metadata and it’s just a tip of the iceberg (it’s a really huge one). By now, you should have a good starting point to know where to look next and dig more into the data as it’s not possible to cover everything in this article. We might be working on a book in that case.
Next, we suggest you step on our path to this wonderland of metadata and put those queries into a nice Splunk dashboard, providing you with the situational awareness of your company’s attack surface. The graphs are nice and even better in case if you need to get some extra budget from your direct manager, as we all know the SOC department is not usually the first one to receive it.
For you and scared managers, you can import into the splunk this dashboard (click to download) which we created by compiling some basic queries discussed earlier giving you a very good starting point:
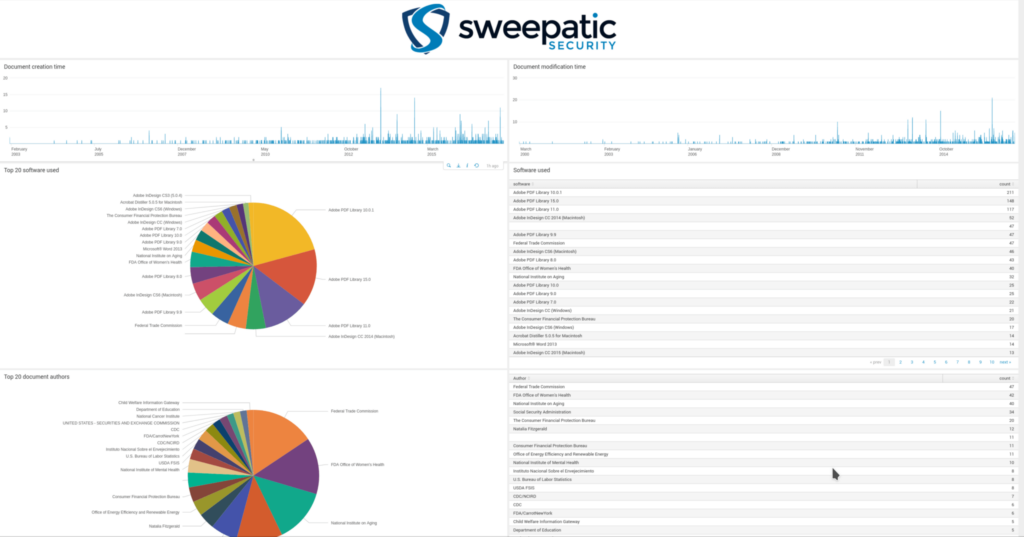
A good practice is to regularly update Splunk about the data your organization is producing and exposing with a combination of saved searches that will alert you that Jane Doe is still using Word 2007 to create confidential information which somehow by pure mistake ended up on the company’s website…
The Outpost24 Solution
It’s vital to frequently monitor the evolution of files and the dark data that are published by your company, enabling you with a completely new type of threat intelligence of your company’s security posture. It’s not about the TI of the attackers of which 99% are never going to attack you, it’s about your own company and how it’s perceived by threat actors.Your security team has an inside view of the company, the processes there, your list of high value targets (HVT’s), and list of (sub)domains, however our experience shows that it’s always incomplete e.g. the vulnerability management team maintains a list of websites to scan that’s most of the time incomplete compared to the reality of what is actually exposed to the internet because it’s managed in some outdated Excel sheet. This view is very different from how the attacker sees your company from the outside and exploits the web assets that are not on your protection list hence not maintained and secured over time.
Outpost24 offer solutions and expert services in the area of reconnaissance, counterintelligence, and OSINT. Through our EASM platform we are able to provide you with a near real-time view of your attack surface in the same way threat actors see you from the outside. In this article we just touched the tip of a very huge iceberg of sensitive information companies are exposing.
Through our platform, we provide a flexible next step to address the danger of this problem. Request your free personalized attack surface analysis with one of our Outpost24 experts.

